How to Make Your Own Maki-Zushi Rolls At Home
Maki sushi (a cut roll) is actually the hardest of the sushi styles to perfect. There are a few variables to keep in mind; the proper proportion of rice to filling, where to place the filling, how far to put the rice, how thick the layer of rice should be and how to roll and cut the finished roll. It may take a lot of practice before your maki turn out as they do when made by your itamae. But even if they are not perfect they can still be very satisfying. Follow our simple instructions and you will be on your way to making maki in no time
Very often trimmings are used to make maki. This reduces waste as well having no effect on the quality of the roll, unless lower quality parts of the fish are used (as is sometimes the case in some sushi restaurants, actually). Feel free to use anything you want in these rolls, I often use my finest cuts to make nigiri sushi and the rest, particularly the scrapings from edge pieces of fish I cut off, into make maki.
What you will need:
- Nori (seaweed sheets).
- Seasoned rice.
- Fillings of your choice.
- A bamboo rolling mat (maki su).
- Sesame seeds or Tobiko (optional garnish for inside out rolls).
Your Many Roll Options
Hosomaki (thin rolls)
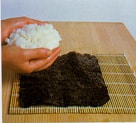
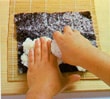
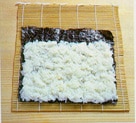
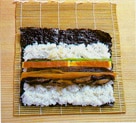
Some are great fans of these thin rolls, and variety is also part of the dining experience so for these, start with a full sheet of nori, shiny side down (yes, there is a shiny side) on the bamboo mat and cover with rice about 1/4 of an inch or slightly thinner. Be sure to leave anywhere from an inch or two of the far end of the nori sheet free from rice, the size depends on how much filling you intend to put in the roll. Also, be careful to not make the rice layer too thick, a common error that is easy to make. The rice should not be packed down, you just want to gently cover the sheet and if you can see some of the nori through the rice it is a good thing, don’t worry.
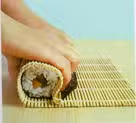
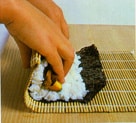
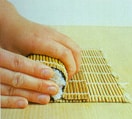
Place your largest filling down first. Then place the smaller filling(s) (if using multiple) on top and in front of the largest, covering it in the direction you will be rolling. When all your ingredients are in place, life the end of the bamboo mat nearest you and fold it over the ingredients, with a careful rolling motion. While doing this, fold the end of the nori into the roll causing it to ‘close’ and continue to roll the mat applying a light, steady, even pressure.
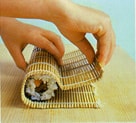
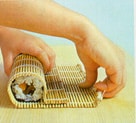
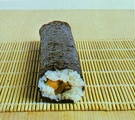
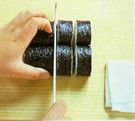
When you have rolled to the end, press the front and back sides of the roll (the sides closest to you and furthest from you) with the mat to firm up the roll and create a vaguely square tube. Apply a slight amount of pressure and hopefully the roll will seal. Remove the mat and trim any excess nori from the maki with the sharp knife. Cut the roll in half, place the halves next to each other and cut two or three more times to make 6 or 8 pieces, depending your preference and the size of the roll. Congratulations! You have made maki!
It is generally not a good idea to prepare a bunch of nori/rice “blanks” with the intention of making two, three, or four rolls at a time. The longer the rice sits on the nori, the more moisture the nori will absorb and then become rubbery and hard to work with. It will become tough to chew as well.
The Creation of Your Masterpiece
|
|
|
|
|
|
|
|
|
|
|
|
|
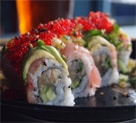
Uramaki (Inside out rolls)
A variation on this theme, for more advanced maki makers is to place the rice on the nori, then sprinkle the rice with sesame seeds or tobiko, then flip the roll over to make an inside out roll. Follow the same subsequent instructions to make an pretty roll with the rice on the outside. It looks different, but tastes pretty much the same. However, when making this style of maki, be careful to not have any extra nori without rice at the end or the roll will not seal properly
For this style you will want to cover the bamboo mat with plastic wrap or the rice will try to incorporate itself into the mat and you can say goodbye to your roll. This style is certainly more advanced and I suggest starting off with hosomaki and trying this only when you are more experienced.
Futomaki (Thick rolls)
Another variation is the thick roll. This is accomplished by placing another half sheet of nori on a sheet to extend it by 50% Using a bit of water or rice moisture to seal), and following the same instructions for the thin roll. This type of maki often has up to six ingredients and can be quite large, so it is often cut into thin (relatively) pieces to fit in your mouth
The fillings should be placed continuing further down the sheet away from you for about two to three inches and rolling can be somewhat more frustrating for a beginner. We recommend trying this when you have made enough hosomaki to be comfortable with the rolling process.
Gunkan Maki (cup-like rolls)
Gunkan maki is a relatively unique style of sushi. The name “gunkan maki” translates literally to “battleship roll” in English, (and is also called “battleship sushi” or “warship sushi”) and it visually resembles a small boat or ship. It is distinguishable due to its unique shape, as well as its shape allowing it to hold small or more liquid items. A commonly seen gunkan maki, for example, is tobiko with a raw quail egg on the top, which when combined, offer a taste and texture experience that would be difficult to replicate with anything else.
Its rice base, which is the foundation of gunkan maki, is a small oval-shaped lump of sushi rice and holds the toppings in place. A strip of nori (seaweed) is wrapped around the rice base, forming the little cup or boat shape. The nori is taller than the rice, creating a wall to hold the toppings.The “boat”‘ created by the nori is filled with various different toppings. Common toppings include ikura (salmon roe), uni (sea urchin), tobiko (flying fish roe), and other soft, loose ingredients that might fall off a regular piece of nigiri sushi.
Gunkan Maki is often served in pairs, which is somewhat typical with non-roll sushi items, and is a popular choice at sushi restaurants due to its visually appealing and highly distinct style. It allows sushi chefs to expand the variety of toppings they offer, particularly items and combinations that aren’t be easily served on traditional nigiri sushi due to their texture or size. This style of sushi is not only a culinary delight but also a creative expression in the art of sushi making.